How to Install MySQL Server on Ubuntu Linux
MySQL is a Free open source database management system popular among Webmasters because of the its stability and rich features. And not to mention MySQL Database works extremely well with PHP Programming Language which make it an important part of the LAMP Stack.
The Purpose of this tutorial is to Learn How to Install and Configure MySQL Server on Ubuntu Linux. In Addition to the Installation we will also look at some useful MySQL commands that will be helpful for the system administrators. For this demonstration we will be using Ubuntu Server 14.04.
Install MySQL Server on Ubuntu 14.
Installing MySQL in Ubuntu Linux is very easy with apt-get command. Open the terminal and type
apt-get install mysql-server
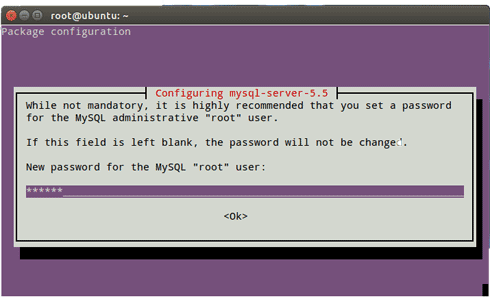
During the installation Process You will be asked to enter a password for the MySQL root user. Make sure you enter a strong password for root user (You can skip this step by leveling the password field empty. But then root can log into MySQL Server without a Password which means a big security hole, even though we can fix it later).
And that all you have to do.
Start MySQL Server
So the installation was easy. Next Step is to start MySQL Server, to do that type following command in the terminal.
service mysql start
Secure Mysql Server
We need to secure the our new Database Server a little further. We can add extra security to DB Server using mysql_secure_installation command. So Open the terminal and type
mysql_secure_installation
The Wizard will prompt you to do the following tasks.
Setting the root password if not already set up
Remove anonymous users – During the installation, anonymous user was created for testing purpose and you should remove them before you move your database server to production environment.
Disallow root login remotely – It is better if you disable root login remotely, which means the MySQL root user cannot log into the database server from a remote computer. I would recommend to say yes.
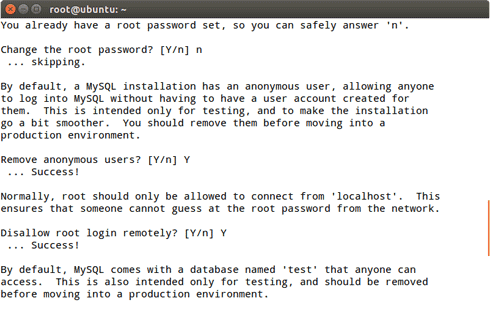
Remove test database and access to it – By default, there is a database called ‘test’ and anyone can access the test database. Like anonymous users, This also created for testing purpose. This Also Should remove before moving to the production environment.
Reload privilege tables – After all above configuration you should Reload privilege tables in order to configurations to be effected, So say yes.
Log in to MySQL Console
Console is the command line interface use to manage the MySQL Relational database management system (RDBMS). Type Following command in the terminal to log in to the console.
mysql -u root -p
Type exit or Press CTRL + C from your keyboard to exit from the console.
Configurations You should Know
Main Configuration file – Ubuntu MySQL Main Configuration file is /etc/mysql/my.cnf
Debian Sys Maint – There is Default user called debian-sys-maint. Detail about the debian-sys-maint user (Including the Password) located at /etc/mysql/debian.cnf. This user has administrative privileges. This is Very useful in the case of you forget MySQL root user password.
Ok That is all about Ubuntu MySQL Installation, Hope you enjoy this post. See you all with more Ubuntu Linux Tutorials.
